Websites transfers, or migrations, move your site from one account, server, or host to another. The result is often a change in the physical location of your website files. During a website transfer, your IP address will change, but your domain name will remain the same. If you are creating a new account with a web host, they will often migrate your website to their servers for free. See popular names in hosting with site transfer services below or sort them by cheapest plans with free site transfers.
Table of Contents
Note: WHdb.com is funded with the help of our visitors. We receive a small commission fee when a user signs up for hosting at no additional cost to our visitors. All information on this website, including prices, is intended to be informational only.
Using Free Websites Transfers
Free site migrations are commonly provided by web hosts for shared, VPS, and even cloud hosting. Most site transfers, especially free services, are limited to only one website and do not include transferring your emails. If you host several websites from a single account, the new host may be open to transferring the entire account instead.
When a host is handling your site migration, you’ll need to
provide them with a few details from your old host, usually an FTP login and
your control panel credentials. During the migration, your files on your old
host will not be deleted or altered
in anyway. Afterwards, you will need to change your nameservers for your domain
(unless your domain registration is bundled with your hosting) and cancel your
old hosting.
If the new host also offers free domain registration with your plan, your domain is usually renewed for a year from the time the transfer occurs. Additional time will not be added to your current registration.
Free site transfers are usually provided when you upgrade your
hosting plan with the same host as well. If your new host does not provide free
site migrations, from my experience they usually will provide free technical
support for setting up your website if you have added your site to their
account and moved over the files yourself. This can be a decent – but not
always reliable – way to move secondary domains.
Moving A Website Between Servers
Moving a site yourself is possible and not too challenging if you understand the basics of web hosting. Before you get started, make sure you have access to the control panel on both hosts and your domain registrar (if your domain registration is separate from your hosting). The following steps assume that you’re using Linux-based hosting and MySQL databases. We’ll be exploring this process in-depth later, but it generally includes:
- Turn off any caching you may be using, including
plugins and 3rd party services like CloudFlare. - Download all of the files necessary for your
site. This typically includes everything in
your website’s folder on your current hosting. You can use the control panel’s
File Manager to accomplish this, but I would recommend using an FTP client
because they make the process faster and easier. - Log into PhpMyAdmin through your old host’s
control panel and export any tables that your site uses. - Create an account with your new host and use
your site’s domain name to register – no matter if the registration is included
with hosting or not. - Through the new host’s control panel, add your
domain as an account (if it’s not done already) and create an empty database in
PhpMyAdmin, preferably using the same names as your old hosting. - Import your database tables and upload your
website files to the new host. - Review your site’s config file to make sure it
points to the correct IP address and database in its settings. - Change your nameservers and DNS records to point
to the new host. While the change often is pushed live after a couple hours,
this can take up to a day or two. - Review your site for potential issues.
- Cancel your old hosting account.
I usually add an HTML comment to my site on the new hosting
just to verify that I am seeing the new hosting and not the old site. You can
also do this using Command Prompt. Finally, it’s advisable to avoid telling
your current host that you are leaving them before you’ve transferred your
site.
Factors That Can Impact Your Site Migration
Several things can impact, hinder, or completely prevent you
or the web host from transferring your site. In my experience from migrating hundreds
of sites, these are issues that I have ran into:
- Moving from Windows hosting (ASP) to Linux
Hosting (PHP) – this is the most difficult challenge in site transfers that
most of us will face. In most cases, this requires advanced technical knowledge
to resolve. - WordPress plugins altering the user.ini file –
changing or commenting out a setting or variable usually resolves this. - CloudFlare pointing to old nameservers – when
you sign up for CloudFlare, you are actually routing your site through their
servers. You’ll need to log into your CloudFlare account and change their DNS
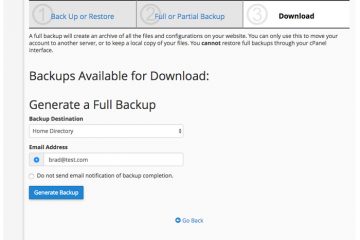
records. - Old Hosts not providing a control panel option
to back up your account or site – web hosts usually provide free site transfers
because they can use your current host’s control panel to easily grab all of
your files with an account backup. You may have to reach out to your current
host and ask them to create an account backup for you. This is usually free or
very low cost. - Old hosts using files that cause issues with the
new host – Some hosts will add a default.html, default.php, or index.html that
only their servers use. Always review the files before doing so, but in many
cases, these files can simply be deleted, resolving the issue. - wp_config.php is using a different DB_HOST – Web
hosts overwhelmingly set this variable to “localhost”, but sometimes it is
different. Changing this variable will fix the issue though.